 Specifications Specifications |
| Model |
EMCC-2 |
EMCC-3 |
EMCC-4 |
EMCC-5 |
EMCC-6 |
| Measuring range ( ID ) |
35 - 60mm |
50 - 100mm |
100 - 160mm |
160 - 250mm |
250 - 400mm |
| Measuring depth |
70mm - 10m |
90mm - 10m |
120mm - 10m |
130mm - 10m |
150mm - 10m |
| Provided rods |
6 rods |
11 rods |
7 rods |
10 rods |
16 rods |
| Provided contact point |
L = 33mm ( flat type ) |
L = 44mm ( flat type ) |
Contact point's travel
and measuring force |
1.4mm less than 2N |
| Extension rods |
EMCC-L ( 1 meter rod × 10 rods = 10 meters ) ---> sold separately |
Compatible linear
gauges ( 1 ) |
 When Resolution is 10µm, use Peacock D-5B When Resolution is 10µm, use Peacock D-5B
 When Resolution is 1µm, use Peacock D-5SB When Resolution is 1µm, use Peacock D-5SB
|
Model ( Gauge Sensor ) |
D-5B |
D-5SB |
|
Resolution |
0.01mm |
0.001mm |
|
Accuracy |
0.01mm |
0.002mm |
|
Cable length |
10 meters |
|
Size of set screws |
M2.5 × 0.45mm |
|
Measuring force |
Less than 0.5N |
|
Remarks |
Specifications are according to D-5S |
|
Compatible
counters ( 2 ) |
 C-500 ( 10µm, 1µm Type ) C-500 ( 10µm, 1µm Type ) |
| Operations |
 Test completes only after receiving reference from a master and inserting the Test completes only after receiving reference from a master and inserting the
micrometer head through a workpiece.
 Automatic centering mechanism requires no manual "shaking" to center up the Automatic centering mechanism requires no manual "shaking" to center up the
micrometer head. |
| Functions |
 Workpiece has to be horizontally level Workpiece has to be horizontally level
( No test can be performed with the workpiece perpendicular ). |
|
|
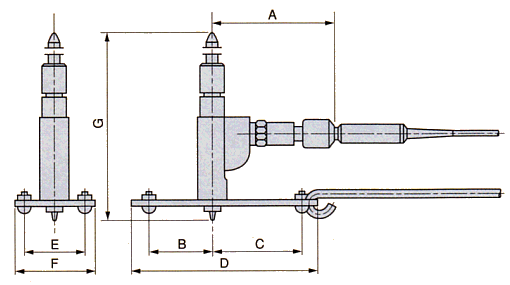
Dimensions
( mm ) |
A |
70 |
71 |
77 |
77 |
77 |
| B |
20 |
30 |
40 |
45 |
50 |
| C |
30 |
40 |
55 |
60 |
70 |
| D |
62 |
82 |
115 |
125 |
140 |
| E |
15 |
20 |
38 |
58 |
88 |
| F |
22 |
30 |
50 |
70 |
100 |
| G |
MIN |
35 |
50 |
100 |
160 |
250 |
| MAX |
60 |
100 |
160 |
250 |
400 |
 To make up a complete working unit, it requires an EMCC ( 2 - 6 ), an EMCC-L ( extension rod set ), To make up a complete working unit, it requires an EMCC ( 2 - 6 ), an EMCC-L ( extension rod set ),
a linear gauge and a counter.
|
 Dimensions Dimensions

|
|